
Whether you’re a gamer craving smoother load times, a professional juggling multiple tasks or simply tired of waiting for files to open, a solid-state drive (SSD) can make a world of difference. Does your machine still run on an old-school hard drive? Upgrading to an SSD is one of the easiest and most impactful ways to breathe new life into your computer. That’s why we created this step-by-step guide to installing an SSD. Regular maintenance, like clearing out digital clutter, is also essential for helping your computer run like (nearly) new. Choose a specialised optimiser like Avira System Speedup.
Leap straight to our guides:
How to install an SSD on a desktop PC
How to install an SSD on a laptop
What is an SSD (and why should you care)?
Perhaps you just love data storage technology? No? Most of us simply don’t care, but understanding the basics of storage can help us make the right choices for our computers so they better meet our needs. Let’s take a quick, shallow dive into the types of data storage. No screwdriver is needed (yet).
A solid-state drive behaves like a hard disk drive (HDD) but is completely different inside. Both are data storage devices, but they do their jobs differently. HDDs are the older, magnetic storage option and use rotating disks, mechanical arms, and a moving head to read, write, and access data. SSDs have flash memory—similar to what you’ll find in a USB drive or smartphone. It’s not called “flash” for nothing as it allows for much faster speeds and greater durability. That’s why with an SSD, your computer is more likely to boot up in seconds, programs should launch almost instantly, and file transfers can happen in a fraction of the time compared to its plodding HDD cousin. Plus, with no moving parts, SSDs tend to be more resistant to damage from drops or shocks, making them a more reliable choice in the long run.
If you’re now asking, “Hang on a minute, then what’s RAM?”, good question. Your computer’s internal memory is called RAM, and an SSD uses memory technology that works like RAM. There is a crucial difference though: With RAM, information is only stored temporarily and disappears when the computer is switched off. An SSD retains its data even when your computer loses power. It’s all thanks to flash memory again, which you’ll already be familiar with from the memory cards in your digital camera or smartphone. Imagine if they were wiped every time your device was switched off!
How to check if you have an SSD or HDD (on Windows 11)
There are a few ways of finding this out. Here’s how to use the Device Manager:
- Right-click on the Start button.
- Select Device Manager from the pop-up menu.
- Expand Disk Drives.
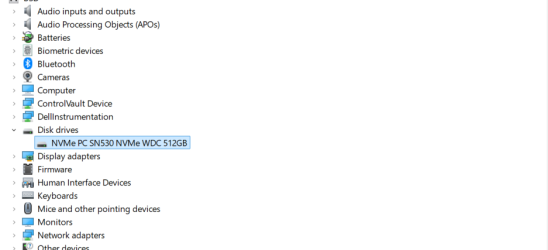
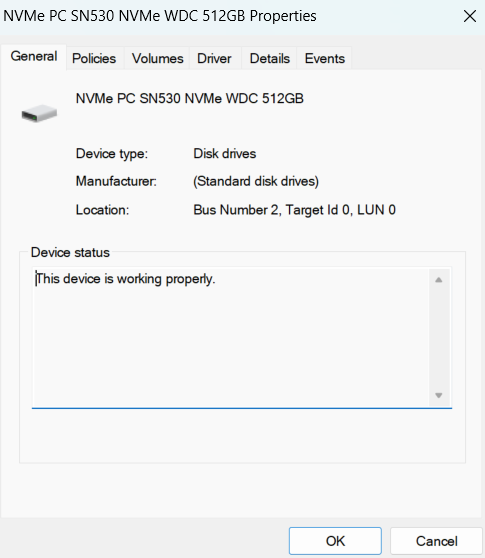
- Double-click the drive to open its properties.
- You’ll see the full names of your hard drives, including the drive type and storage type.


Should you upgrade to an SSD?
Yes, if you’re serious about speeding up your computer. You’ll already have gleaned that SSDs are much, much faster than hard drives. You’ll really appreciate the difference when working with large files like pictures and videos—or perhaps you want to build your own gaming PC for smoother, more immersive gaming? SSDs have nearly eliminated data access times because they don’t have to wait for a tedious mechanical arm to reach the designated area on a disk. And because they don’t spin, they use less power and last longer. There’s a disadvantage though: SSDs are generally much more expensive than conventional hard drives so you’re paying more for less storage space. It’s a balancing act between budget and performance. Thankfully, prices keep falling as SSD storage becomes more widespread, so hang in there.
If you transition to an SSD, remember to kick old habits! Never defragment your solid-state drive. HDDs need sequential data so the drive’s head doesn’t have to jump around too far, allowing them to perform best with defragmented data. SSDs read data in parallel from different locations, so they like data to be fragmented. Please remember to do this manually if your operating system doesn’t automatically disable defragmentation.
Choosing your SSD: Meet the different types of SSD technology
Flash memory is based on memory cells, and two types of these are used in SSDs: The most common and affordable is the MLC (Multi-Level Cell), which allows more data to be written to a single cell of the drive. There’s also the SLC (Single-Level Cell), which writes one bit of data at a time. SLC drives are more common in servers because they offer superior performance and longevity. SSDs for consumer devices will usually be MLCs—but don’t worry! They should still outlast a hard drive several times over.
When looking at how to install an SSD, it’s essential to know whether it’s an M.2 SSD or SATA as they’re installed in different ways, and each offers different benefits and drawbacks. M.2 SSDs take up less space and use less power, and those with NVMe specifications are significantly faster. However, they’re also more expensive and have limited capacity.
If your mind is fizzing with the options and acronyms, here’s a quick overview:
- SATA-based SSDs are the lowest grade of SSDs in terms of performance, but they’re still a good choice for improving speed as they’re faster than HDDs.
- mSATA SSDs are designed for portable devices like tablets and notebooks.
- NVMe SSDs (Non-Volatile Memory Express SSDs) are faster than SATA SSDs.
- 2 NVMe SSDs are smaller than SATA SSDs and you’ll usually find them in tablets and ultra-thin laptops.
Beware! Some older motherboards might not be compatible with the more recent M2 SSD standards, so doing your homework is vital. See this guide on the best SSDs for 2025.
Essential preparation before installing an SSD
So, you’ve chosen your SSD but don’t dive straight in (yet)! Preparation is key to a successful transition. Have the right equipment to hand and back up your data before you get started. You can buy SSD installation kits for PCs and precision kits for laptops. These include brackets, cables, screws, and screwdrivers.
Get the right tools: Your checklist
- A compatible internal storage drive
- If installing a SATA SSD: SATA data cable if it’s not included with the SSD
- If installing a SATA SSD: SATA power cable
- Screwdriver (your computer manual will specify the type of screwdriver)
- Mounting screws (if required)
- Your computer manual
- Anti-static protection, like an anti-static wristband, to help avoid damaging your computer with static electricity.
The main difference between installing an M.2 SSD and a SATA SSD is that an M.2 drive plugs directly into the dedicated slot on your motherboard, so it doesn’t need a separate cable. A SATA SSD requires a SATA cable to connect to the motherboard.
Back up your data
Before installing your new SSD, it’s crucial to back up your important data to an external hard drive or cloud storage. Although it’s usually smooth sailing, installing a new drive could potentially lead to data loss or corruption if it’s not done correctly. Ideally, you need to create a complete image of your current hard drive before replacing it with the SSD. Cloning your hard drive helps create an extra layer of security. Most operating systems have built-in backup utilities to create system images and to back up important files. You can also use specialised, third-party cloning software to create a complete clone of your existing hard drive, which can then be transferred to the new SSD.
Top tip: Consider keeping your old drive when you’ve finished the installation. You can use your HDD as secondary storage for less frequently accessed files.
Prepare your workspace
Clean up your work area. Remove any plastic bags or papers to help ensure you’re working in a static-safe environment. If you’re using anti-static protection, put it on.
Always remember! To help protect your new SSD, never touch the connectors on the drive. Also, don’t open the SSD, as doing so will void the warranty.
How to install an SSD on a desktop PC
After you’ve completed the essential preparation above, follow these step-by-step instructions to install an SSD onto your desktop PC. If you encounter any problems, jump to our troubleshooting section.
Step 1: Power down your PC and open it up
Switch off your PC and unplug all the cables. Hold down the power button for 5 seconds to discharge residual electricity. Then open the computer case and refer to your owner manual for instructions on how to do this. If you’re not wearing an anti-static wristband, ground yourself by touching an unpainted metal surface to help prevent static discharge.
Step 2: Locate the storage bays
Refer to your owner’s manual for the location of the storage drives and bays and note the size of the bays. Some storage bays and existing hard drives are much larger than a standard SSD. If that’s the case, you’ll need a 2.5-inch to 3.5-inch converter to ensure the SSD fits snugly. Remove your old drive and disconnect any cables and brackets attached to it.
Step 3: Mount the SSD into your system
Secure the SSD in the drive bay using the appropriate screws. Never force the connection—it should fit snugly but still plug in easily.
If you’re installing the SSD as a secondary drive: Use a SATA cable and attach one end to the SATA port on the motherboard. Attach the other end of the SATA cable to your SSD. Then, take the available SATA power cable (coming from your system’s power supply) and connect it to the SSD.
If you’re installing the SSD as a primary drive: Carefully disconnect the SATA power and data cables from your current hard drive and remove it from the bay. Then securely insert the SSD into the same bay, making sure that it’s properly aligned. Connect the SATA power and data cables to the SSD.
For either installation, consult your owner’s manual for instructions on removing an existing drive (if necessary) and handling the cables. Make sure all cables are securely connected before proceeding.
Step 4: Reassemble your computer
Replace the case cover and reconnect all external cables.
Step 5: Power on and set up your desktop PC
Turn on your PC and enter the BIOS/UEFI to ensure that the new SSD is detected. If you’re installing an operating system, follow the OS installation process. Now it’s time to test it out to see if you’ve morphed from tortoise to hare! You should see some significant performance improvements over your HDD.
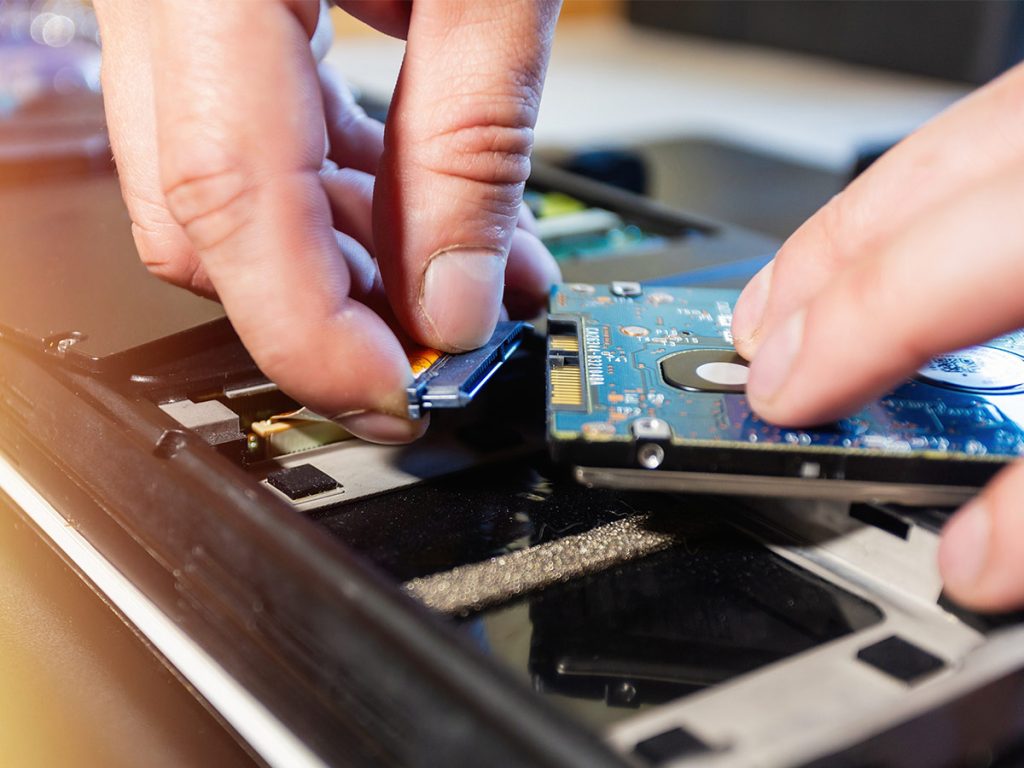
How to install an SSD on a laptop
Have you completed the essential preparations, such as backing up your data? Then you’re ready to follow these step-by-step instructions to install an SSD on your laptop. If you encounter any problems, jump to our troubleshooting section.
Step 1: Power down your laptop
Power down your laptop and unplug the charger. If the battery is removable, remove it. Hold down the power button for 5 seconds to discharge residual electricity.
Step 2: Open the laptop case and locate the hard drive bay
Refer to your laptop’s manual to locate the access panel. Remove any screws and carefully open the panel. Ground yourself by touching an unpainted metal surface or using an anti-static wristband.
Step 3: Remove the existing drive
Disconnect and remove the current hard drive. Remember how it’s connected, oriented, and secured as your new drive will be inserted in the same way. You want to look out for any brackets, adapters, pull tabs, or screws that might be attached to it.
Step 4: Install the SSD
Secure the SSD into the same slot, ensuring it’s properly placed and aligned. Then, secure it using the same method as the old drive. Never force the connection—it should plug in easily and fit snugly.
Step 4: Reassemble your laptop
Replace the access panel and screw it into place. Reinsert the battery if you removed it.
Step 5: Power on and set up your laptop
Turn on your laptop and enter the BIOS/UEFI to confirm that the SSD is detected. Then, install your operating system. You may need to adjust settings in BIOS/UEFI for optimal SSD performance. Now it’s time to test out your new machine! Hopefully, you’ll notice impressive speed enhancements and your laptop will feel like a Formula 1 car (nearly).
SSD installation woes? See our SSD troubleshooting guide
We’ve answered some typical questions here. First, check that everything is where it’s meant to be and that no connection is loose. Then, verify BIOS settings for peace of mind that your SSD is being recognised. Remember, if you run into issues you can’t resolve, get help from a professional technician.
- Why isn’t my desktop recognising my SSD?
Is the SSD not showing up in BIOS or Disk Management? You’ll need to ensure that the SSD is connected correctly. Check the cables and make sure the SSD is enabled in the BIOS settings. For further information, see these quick fixes if a Windows 11 PC isn’t detecting your SSD. - Why did my SSD suddenly disappear from my system?
No, you aren’t presiding over a Bermuda Triangle of desktops. A sudden loss of power or rare software events can cause a system to stop recognising an SSD. The SSD can often be returned to normal operating condition by switching your computer off and on again (this is called power cycling). It’s also a good idea to optimise your power settings for SSD use. - How do I initialise a new SSD?
Open Disk Management, right-click on the unallocated space on the SSD, and choose “Initialise Disk”. Windows Support offers help in initialising new disks. - How do I format my SSD?
To format an SSD on a Windows PC, open Disk Management, right-click on the SSD, select “Format,” choose your desired file system and then click “Start” to begin the formatting process. - Why is my SSD so loud?
SDs should be whisper quiet as they don’t have moving mechanical parts. If you hear noise, it’s most likely coming from another component, like your computer fan (See our blog to quieten a loud computer fan). Check if your computer is overheating. If the problem persists, consider getting the help of a computer professional to avoid potential hardware damage. - Why is my laptop or desktop still slower than I expected?
Upgrading to an SSD isn’t a magic panacea for all performance problems as there are many reasons for a sluggish machine. Could a malware infection be slowing it down? Have you been clicking update reminders away? Annoyingly, outdated software can be vulnerable to online threats and cause compatibility issues so it’s essential to keep all software up to date—and don’t forget to update your drivers. If your computer’s RAM is full, it will use virtual memory on your hard drive, which is slower. Over time, machines become clogged with digital junk like duplicate and temporary files and need a regular spring clean to keep running at their best.
Help keep your PC and other devices in tip-top shape with Avira
Cleaned, optimised devices don’t just boot faster and run more quickly and smoothly—they can also have a longer battery life. Thankfully, specialised software makes it easier to clear the clutter and stay on top of routine maintenance. The essential, free optimiser from Avira is available for all devices: Choose from Avira System Speedup for Windows and Avira Free Security with a built-in optimiser for Mac. Help give your mobile devices a clean-out and boost with Avira Antivirus for Android and Avira Mobile Security for iOS.