
Even though computers and laptops now come with ever greater amounts of storage, at some point or another you’ll find you’ve run out of space and your device is getting slower and slower. But thankfully, help is at hand! Read on for a step-by-step guide on what you need to do to beat the bloat and how to clean up your Windows PC and Mac. Also discover how to keep your hard drive decluttered using Windows and macOS’s automatic cleanup features. You can also make life far easier for yourself by simply using a clean-up solution like Avira Free Security to scan your computer for unnecessary clutter and remove it.
Great reasons to clean up your hard drive
Let’s start by defining what a hard drive actually is. The term hard drive is actually a shortened form of the term hard disk drive (HDD), meaning a storage device in which data is stored on rotating magnetic disks. These days, people use the term “hard drive” to mean any kind of internal storage in a computer or laptop — regardless of the underlying technology. In modern machines, that usually means an SSD solid state drive (SSD), which is now the de-facto storage solution because it’s far faster, more reliable, and more compact than a conventional HDD. If you’d like to know more, check out our article on the differences between HDDs and SSDs.
Over time, an ever-increasing number of apps, documents, photos, and videos — as well as junk files — accumulate on your Windows PC or Mac’s hard drive. And with storage space being finite, one day your hard drive will eventually reach its storage limit. Once your hard drive is full, you won’t be able to update your system and apps, and you won’t be able to save new files. And because Windows and macOS use part of the hard drive as virtual memory, your system can become significantly slower or unstable. In addition, many programs require temporary storage space when they are run. If this is no longer available, they’ll no longer function properly or will crash.
You’ll want to clean up your computer and thoroughly clear your hard drive’s storage space before you reach that point.
In doing so, you’ll:
- Free up disk space: Removing unnecessary files, temporary data, and old programs frees up space on your hard drive.
- Improve system performance: Less bloat means programs start faster and your system runs more smoothly.
- Prevent system errors: Old or corrupted files can cause errors or crash programs.
- Update smoothly: You need adequate free storage space to ensure operating system and software updates go smoothly.
- Minimize data privacy risks: Removing temporary and cache files can delete sensitive data, boosting your privacy.
- Extend the service life of your hard drive: Reducing the read and write load caused by overfilled drives protects the hardware.
As you can see, there are plenty of great reasons — let’s start with the first step of cleaning up your disk space.
1. Create a backup to avoid data loss
In the hustle and bustle of tidying up, you might accidentally delete files that you still need. To avoid that hands-on-your head moment, back up your hard drive before you clean it. If the worst has happened, check out our article on how to recover deleted files.
On a Mac: Create a Time Machine backup
- Connect an external hard drive with sufficient free storage space to your Mac via USB or Thunderbolt.
- From the Apple menu in the top left corner, choose System Settings, click General, then select Time Machine.
- Now click Add Backup Disk, select the connected external hard drive, and click Set Up Disk.
- In the Time Machine menu in the menu bar, click Back Up Now.
Tip: You can also back up important folders (Desktop and Documents) to iCloud Drive, the file storage and file syncing part of Apple’s iCloud service.
On a Windows PC: Create a system image
- Connect an external hard drive with sufficient free storage space to your PC via USB.
- Open the Start menu and search for Control Panel.
- Click System and Security followed by Backup and Restore (Windows 7) — the utility is the same in Windows 10 and 11.
- Click Create a system image on the left to create a full backup (alternatively, you can also create a mini-backup with selected folders using Windows Backup. To do that, click Set up backup on the right and follow the on-screen instructions).
- Select the connected drive as the backup destination and click Next.
- Now select which drives you want to include in the backup, click Next, and then choose Save settings and run backup.
Tip: With a OneDrive (Microsoft’s cloud storage service) Windows backup, you can also save specific folders (Desktop, Documents, and Pictures) as well as Windows settings in the cloud. Learn here how to create this partial Windows back up.
2. Determine storage space & identify storage hogs
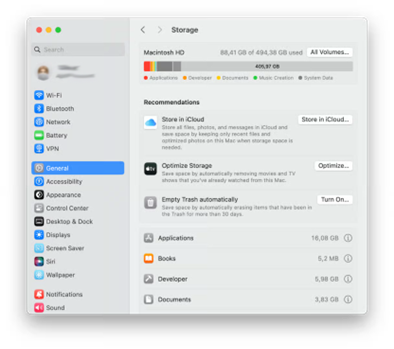
To find out how much storage space you’ve already used and how much remains on your PC or Mac, go to the storage overview. There you’ll see which content is hogging the most storage space and recommendations on how to free up space. You’ll learn exactly how to do this later in this article. [H4] On a Mac (macOS Ventura and later)
Open System Settings via the Apple menu in the top left corner, click General in the sidebar, and then click Storage on the right.
Here you can see:
- Storage usage: A bar chart shows you how much storage space you’ve used and how much is free. In the used area, the individual categories (Documents, Applications, System Data, Music, etc.) are each color coded.
- Recommendations: Here you’ll find options to automatically optimize Apple TV storage, empty the Trash, and for storing files in iCloud.
- A list by category with corresponding storage use: Clicking the i icon next to each category opens a new window with further information, such as a detailed list of the corresponding content sorted by size. You can then manage this content right from there, via Finder, or using the corresponding application.
On a Mac (macOS Monterey and earlier)
Open the Apple menu in the top left corner and click About This Mac. Now, in the tab bar, click Hard Drives or Storage (depending on your macOS version).
Here you can see a bar chart of how much storage space is still available and what the occupied space is being used for (System, Apps, Documents, etc.). Click Manage for a detailed list.
On a Windows PC
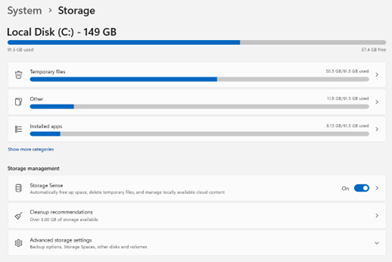
Open the Start menu and click Settings. Now click System and then select Storage.
Windows 10: Here, a bar chart showing the corresponding memory consumption and remaining space will appear for each drive. After clicking on one of the drives, such as “This PC (C:)”, a breakdown by category will appear (such as Apps & features, Temporary files, Documents, etc.).
Windows 11: Here you’ll see a list of the different categories of your primary system drive (C:) directly in the storage overview or by clicking Show more categories. The order and labeling of the following items may vary depending on your Windows version.
Here you can see:
- Storage usage: A bar chart shows you how much storage space is already used and still available on your primary system drive (C:), which is usually called “Local Storage”, “Local Disk”, “This PC”, or “System”. This is the default storage location for the operating system, your apps, and data.
- A list by category with corresponding storage use: After clicking one of the categories, a sub-area will open with further information, such as a detailed list of the content sorted by size. You can then manage this content right from there, via File Explorer, or using the corresponding application.
- Memory management: This is where you’ll find Storage Sense (which automatically frees up space), cleanup recommendations, and advanced storage settings.
3. Delete apps you no longer need
In the storage overview, you can now access the category “Applications” (Mac) or “Apps” or “Apps & features” (Windows) and check whether you really still need all the programs listed. If not, just delete or uninstall them.
You’ll likely also find pre-installed bloatware on your computer, which you can remove. This is software from the device manufacturer which is of no use to you and only sits there eating up precious storage space and resources, such as weather, stock market, or gaming apps. In some cases, however, pre-installed programs cannot be deleted, such as system apps.
On a Windows PC, apps you rarely use can be archived automatically to save storage space. You can find this option under Settings > Apps > Advanced app settings. If turned on, these infrequently used apps will be archived while retaining their data and settings. The next time you use the app, it’ll be downloaded and installed again automatically from the Microsoft Store — but only if it’s still available.
Tip: Windows users can also delete apps they haven’t used in a long time via the cleanup recommendations to free up storage space. You can find out more about this further down in this article.
4. Find and delete large files
On a Mac
Clicking on the “Documents” category in the storage overview will bring up a window with a tab bar, allowing you to view “Large Files”, “Downloads”, and “Unsupported Apps”. Files are listed under each category sorted by size, but you can sort them by “Name”, “Kind”, or “Last Accessed”. Within the “File Browser” section, you’ll see the contents of the folders in your file system along with the storage space they occupy. From here, you can select files you no longer need across all categories and either delete them directly or move them to the Trash. You can also open files and folders in Finder if you prefer to manage them there.
On a Windows PC
Clicking the “Documents” category in the storage overview will — depending on your version of Windows — either show a list of individual files sorted by size or open the folder directly in File Explorer. There you can sort the files by size, for example, and then decide which ones you want to delete. In some Windows versions, clicking the category doesn’t open the folder directly but first displays an information or action overview.
Tip: You can also use Windows’ cleanup recommendations feature, which suggests files you might want to delete — such as large files or files you haven’t used in a long time. You can learn more about this feature in the section “Using Windows cleanup recommendations”.
5. Delete temporary files
Your system and apps create temporary files to perform specific tasks. These include cache, installation, and log files. In an ideal world, they’re deleted automatically as soon as they are no longer needed. In practice, though, they often hang around, accumulating gradually, and hogging a lot of storage space. Outdated or corrupted files can also cause errors and lead to performance issues.
Over time, several gigabytes can accumulate in the browser cache, taking up a lot of storage space. Check out our article on clearing your browser cache to learn how to clear the cache of Firefox, Google Chrome, Microsoft Edge, Opera, and Safari as well as the corresponding Android and iOS apps to free up storage space.
On a Mac
macOS automatically removes many temporary files, logs, and old updates, and also largely manages cache files itself. This means that you rarely have to do anything yourself, which is great since it’s not recommended you do go removing anything as it can cause problems. As such, only delete cache files when troubleshooting and only if you know what you’re doing. In our article on cleaning up your Mac, you can learn how to clear your Mac’s system and hardware cache as well as the user and software cache, among other tips.
On a Windows PC
Compared to a Mac, on a Windows PC there are several ways to remove temporary files to free up storage space.
Option 1: In Windows 10 and 11, you can delete temporary files by clicking on the category in the storage overview. You then just need to select the desired subcategories (such as Recycle Bin, Downloads, Windows Update log files) and click Remove files.
Option 2: Another way is via the Disk Cleanup utility for even more thorough cleaning. Here’s how:
- Search for Disk Cleanup in the Start menu and launch the app.
- Select the drive — usually (C:) — and click OK.
- Tick the desired options (such as Temporary Internet Files, Downloaded Program Files, Recycle Bin, etc.)
- Click OK below and then Delete Files in the subsequent confirmation window.
To free up even more storage space, you can also click the Clean up system files button, which is usually located among the other category options in the Disk Cleanup window. The utility will then restart with administrator rights and display additional, system-level categories (such as old Windows versions and update files). Only delete these system files if you are certain you no longer need them, as otherwise this may cause problems with the operating system (such as the inability to revert to a previous Windows version or missing updates).
Option 3: Use the cleanup recommendations provided by Windows as described in the next section.
See the section “Turn on automatic optimization features” below to learn how to have Windows clean up temporary files automatically.
Using Windows cleanup recommendations
The cleanup recommendations in Windows 11 and later versions of Windows 10 can often free up a lot of storage space. In the storage overview, click Cleanup recommendations and then on the categories you want to clean up. You can also see under each subcategory how much storage space you can free up.
- Temporary files: Here you can select various subcategories such as Downloads, Recycle Bin, and Windows Update Cleanup and then remove the corresponding files.
- Large or unused files: Here you will see large files that you haven’t opened for a long time, which you can now delete.
- Unused apps: Here you will find apps you haven’t used for a long time, which you can now uninstall.
- Files synced to the cloud: This section displays files that are stored both in the OneDrive cloud and on the PC, and which you rarely use. If you want, you can now remove the local copies to free up storage space. However, “OneDrive Files On-Demand” must be turned on for this to work. The section “Offload files to the cloud” explains how to turn on this option.
Turn on automatic optimization features
If you want, your Mac or Windows PC can clean itself automatically using built-in utilities. To do this, access the storage overview as described above and turn on the desired options.
On a Mac: Turn on recommendations
- Optimize Storage: Movies and TV shows that you’ve already watched are deleted automatically from the device, but can be reloaded at any time.
- Empty Trash automatically: Items that have been in the Trash for more than 30 days are erased automatically.
- Store in iCloud: Here you can select which content you want to store in iCloud or with iCloud Drive. To free up space on your Mac, you can also turn on the “Optimize Mac Storage” option. This means that only recently used files remain on the Mac, with older, less-used files offloaded to iCloud when storage space is needed. Learn how to turn on this option further down in the section “Offloading files to the cloud”.
On a Windows PC: Turn on Storage Sense
- Turn on the Storage Sense feature.
- Customize Storage Sense.
- Turn on “Cleanup of temporary files”: Temporary app and system files are automatically cleaned up.
- Turn on “Automatic User content cleanup”: Here you can also configure cleanup schedules or accept the default settings.
- Run Storage Sense: During low disk space (default)
- Delete files in my recycle bin if they have been there for over: 30 days (default)
- Delete files in my Downloads folder if they haven’t been opened for over: Never (default)
- Delete locally available cloud content: Content will become online-only if not opened for more than: Never (default).
To use this feature, you’ll need to ensure “OneDrive Files On-Demand” is on. Learn how to do that in the section “Offload files to the cloud”.
- Confirm your settings by clicking Run Storage Sense Now.
Use a PC cleaner
Probably the easiest way to free up storage space on a Mac or Windows PC is to use a third-party tune-up utility such as Avira Free Security. That’s because, in addition to many protection features, it also includes optimization utilities that help you clean up your hard drive and free up storage space in just a few clicks.
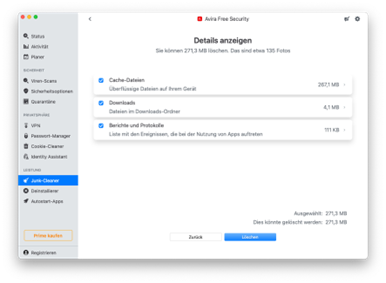
On a Mac: Use a junk cleaner
Avira Free Security for Mac includes a junk cleaner that allows you to locate and delete junk files (such as cache files, downloads, and logs).
On a Windows PC: Use tune-up utilities
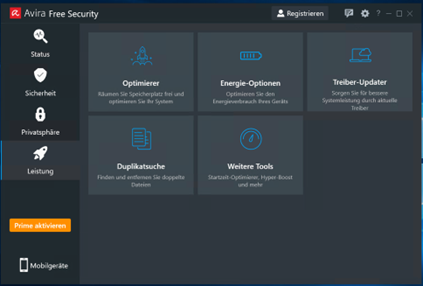
The “Performance” section of Avira Free Security for Windows provides you with various utilities to free up more storage space and tune up your system. Among other things, the optimizer helps you scan your PC for junk data such as temporary and cache files. The duplicates finder also allows you to find and remove duplicate files. Check out our article on cleaning up your PC to learn how to use Avira System Speedup’s tuning tools — which are also included with Avira Free Security — to rev up your PC.
Move files to an external hard drive
To free up storage space, you can also move large and rarely used files such as photos and videos to an external hard drive. Before using an external hard drive to back up your data, check whether the hard drive is formatted with a suitable file system. For users who want to switch between Mac and Windows or exchange data, the exFAT format is ideal as it’s supported by both macOS and Windows. By contrast, the NTFS format is for Windows, and the HFS+ format is optimized for macOS. If needed, you can also reformat your hard drive.
Once you’ve connected the hard drive to your computer, it will appear on a Mac both on the desktop and in Finder. On a Windows PC, it appears in File Explorer under “This PC” with its own drive letter. Now open the hard drive in a new window, select the desired files or folders, and drag and drop them into the window. On macOS, you can also drag the files directly onto the hard drive icon on the desktop. You can then remove the files that have now been saved to the external hard drive from your Mac or Windows PC. Since external hard drives can get damaged, storing data in the cloud is a safer solution.
Offload files to the cloud
Instead of using an external hard drive, you can also offload rarely used or large files to the cloud, meaning you only make them available online and remove them from your Mac or Windows PC. Use either the platform’s own cloud storage solution or one from a third-party provider, such as Dropbox. By the way, our article on cloud security details how you can improve the protection of your data in the cloud.
Log in to your cloud storage service account and, if necessary, turn on the desired function (such as iCloud Drive in iCloud). If you haven’t already done so, you can now select which folders you want to have automatically saved and synchronized in the cloud so you can access them from any device.
Once you’ve done that, follow these steps.
On a Mac: iCloud Drive “Optimize Mac Storage”
iCloud Drive offers the option “Optimize Mac Storage” to automatically delete older files from your device and make them available only online when space is needed. You can still see them in Finder (with a cloud icon) and you can download them again from the cloud if needed.
Unfortunately, although you can’t specify which files will be offloaded, you can choose which files or folders should not be removed. To do this, select a folder or file downloaded from iCloud Drive, right-click to open the context menu, and click Keep Download. The file will then be saved locally and will no longer be automatically removed when macOS wants to free up storage space.
Here’s how to turn on the “Optimize Mac Storage” option:
- Open the System Settings via the Apple menu in the top left corner and click on your Apple account name in the sidebar.
- Select iCloud and then iCloud Drive.
- Tick the option Optimize Mac Storage.
On a Windows PC: Files On-Demand
OneDrive also offers the option “Files On-Demand” to free up storage space on your PC. If this option is turned on, you can select files and folders that should only be stored online and not locally. To do this, select a file or folder in the OneDrive folder, right-click to open the context menu, and click Free up space. You’ll still see those files and folders in File Explorer (with a cloud icon) and you can download them again if needed.
You can also select the “Always keep on this device” option via the context menu. In doing so, the folder or file will not be automatically deleted, even if you’ve set a period under “Locally available cloud content” in the Storage Sense settings after which files are automatically offloaded to a different location.
Here’s how to turn on the option “Files On-Demand”:
- Click the OneDrive icon in the taskbar and then select Settings.
- Click Sync and backup.
- Go to Advanced settings.
- Under “Files On-Demand”, click Free up disk space.
Zip files
To free up storage space, you can also zip large image, video, and audio files or folders that you rarely access.
Zipping reduces their file size by storing data more efficiently and combining multiple files into one package. Both Windows and macOS offer built-in functions that allow you to compress files into a ZIP archive to save storage space.
To do this, simply select the desired file(s) or folder(s), then right-click to open the context menu. You can usually find the compression option under “Send to” on Windows, while on Mac you’ll see it straight away. After clicking the option, a new ZIP file will be created in the same location.
You can also find third-party compression tools such as WinZip or WinRAR, which sometimes use more advanced compression algorithms to compress files more efficiently than the operating system’s built-in ZIP function.
To unzip zipped folders and files, simply double-click the compressed folder and drag the contents to a different location.
Empty the Recycle Bin/Trash
Not everything you deleted during your cleanup may have been removed from your Mac or Windows PC. In some cases, the files, folders, or programs are first moved to the Recycle Bin/Trash, where they still eat up storage space. That’s why it’s important to empty the Recycle Bin/Trash once you’re done to remove files once and for all from your Windows-PC or Mac and free up storage space.
Make life easier for yourself
You now know there are many different ways to free up space. Doing a proper, thorough cleanup always pays off — and you’ll enjoy a smoother running system as a result. And the best news is that there are tune-up utilities out there like Avira Free Security which can make your job easier. It’s best to run a Smart Scan regularly to not only free up more storage space but also to fix cybersecurity, performance, and privacy issues with just a few clicks.